Showing posts with label glitter. Show all posts

12/3/11

Cute Christmas Decor!

These past few days I have been working on some cute Christmas signs and I  am so excited to be finished so that I can finally share them... I am so proud! Now normally I'm not great at coming up with my own ideas. I'm good at copying ideas that I've seen and tweeking them to make them a little more personal, but nothing original. This time, however, the idea was completely my own- you may have seen something similar, but I haven't so I feel I can actually claim true personal creative credit for this one!  So here they are, my own fabulous additions to my Christmas decor! Love them!
Although I am so proud of my originality,  I love to share my ideas and I'd love to be the inspiration for someone else's creativity instead of it always being vice-versa. So I'll share with you just how I made them in hopes that someone else out there will love them enough to make them their own as well. This project really only takes a few hours and can be broken down into less than 10 steps (or fewer if you do things a little differently- I chose the longer and harder process just because of what I had, and didn't have, at the time I started).


Supplies needed: canvas, paint and paintbrush/or vinyl letters, ribbon, glitter spray, glue

  • Step 1:Paint your entire canvas white. I did this just because there was some imperfections on my canvas and I also wanted it a little whiter, so you could skip this step if you're happy with the appearance of your canvas. 
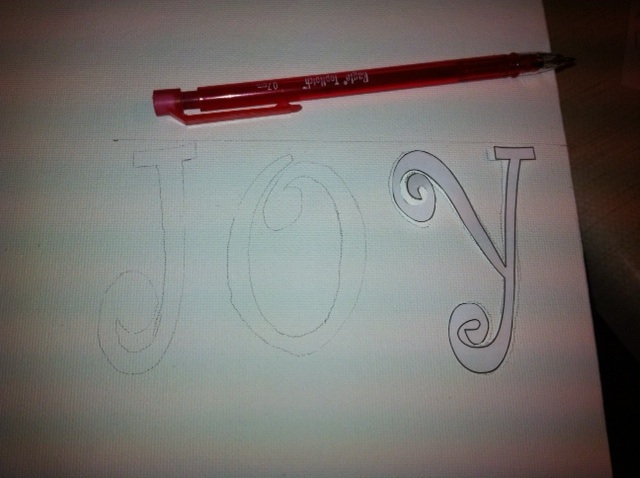
  • Step 2: Hop on the computer and find a font that you like. Now create your words using the Word Art function on Microsoft Word. Print it.
  • Step 3: Cut out your words, letter by letter- a long and tedious task!
    • You could completely skip these last two steps by getting some wood letter from the craft store. Highly recommended if you are short on patience or time! Then you could also skip to step 5.
    • And if you have access to making your own vinyl letters you can actually skip straight to step 6.
  • Step 4: Lightly trace your letters onto the canvas with a pencil.
  • Step 5: Paint your letters. This is where some painting skills can come in handy. I have none, however, so if I could do it, you could do! Also I recommend using a paintbrush with a nice straight edge! 
    • If you bought wood letters, painting them is a lot easier because you don't have to be exact and within the lines. Let your letters dry, then adhere them to the canvas.
  • Step 6 (optional): Spray your entire canvas with some glitter spray. This step is totally optional, but I love the little bit of shimmer it adds. I used a white glitter called Diamond Dust from Michaels Craft Store.
  • Step 7: Add some ribbon. I cut my ribbon about an inch longer than the canvas so I could glue the ends of the ribbon to the back. Be sure to pull the ribbon taught after you glue one end before gluing the next.
  • Step 8: Add a bow or any other sort of item you please. I chose a bow just because I thought they looked a little like presents, but also a Christmas flower, bells or pinecones could look cute!
    • I made my own bow like this:


lay your ribbon down in a zig-zag pattern like this
pinch the center of the ribbons together. don't worry if it doesn't look great at first, you can always adjust it.
secure with some thread tied around the center.
cover the thread with a small section of ribbon and hot glue to the back.


  • Step 9: Attach the bow wherever you please.
  • Step 10: Repeat for as many signs as you would like!
Now I just have these signs leaning up against the wall, but I think it would be really cute to hang them by a ribbon.  I may decide to do that later, but for now, I'm on to my next craft project...Christmas is only a few weeks away...eek!

11/26/11

Glitter Ornaments!

Okay now that Halloween and Thanksgiving are over, I can finally get into the Christmas mood.  I guess I'm a little late to start thinking about Christmas since it's literally been all over the place since mid-October, but I really just can't get myself to do it before now (please people! one holiday at a time!). So to kick things off my sister and I made these super cute glitter ornaments.  Glitter, of course, is a staple in Christmas decorations and is so much fun, but it can leave your house looking like a disco ball exploded all over your living room! So what's so great about these glitter ornaments is that all the glitter is inside so there is no mess! (well there is still a little bit of glitter explosion when you're making them, but not bad really). They are also super easy to make and would be a great family activity that even the little ones can get in on. I'm sure I'll be making more of these next year with my little girl!


-So to start off, get yourself some clear ornaments. They can easily be found in any craft store around this time of year. Now pop the top off all of them.


Ha! There's my sister with the ornament that she dropped literally
2 seconds after I took this photo!

-Take your glitter adhesive and squirt just a little bit into the ornament.  I used Glitter It by Beacon Adhesives (also found at the craft store), but I've also heard that you could use floor wax. Now swirl it around to coat the entire inside of the ornament. Add more if needed. Avoid shaking it or else it can become frothy. Pour out the excess.


-Next, immediately pour glitter into the ornament.  I recommend using fine glitter because I think it looks best and covers the ornament more evenly, but play around to see what look you like best. To avoid a glitter explosion it's best to use a funnel of some sort.


-After you pour the in the glitter, swirl and shake the glitter around to coat the inside.  Do this fairly quickly so the glue doesn't dry out on you.


-Shake out any excess glitter and allow to dry for about 20 minutes or so. Pop the tops back in the ornaments and Voila, you have super cute ornaments!


Notice the missing one...ya, that's the one my sister dropped! Haha :)


Can wait to get these up on my tree!